Welcome to The DIY and Crafts, your go-to destination for all things related to crafting and home improvement. In this article, we’re going to dive into the world of DIY farmhouse tables, a popular trend in home decor that can add a rustic and charming touch to any space. Whether you’re an experienced woodworker or a beginner looking to try your hand at a new project, building your own farmhouse table can be a rewarding and satisfying experience. In this article, we’ll provide a step-by-step guide on how to build your own DIY farmhouse table, from materials and tools needed to finishing and decorating the final product. So, let’s get started!
Introduction
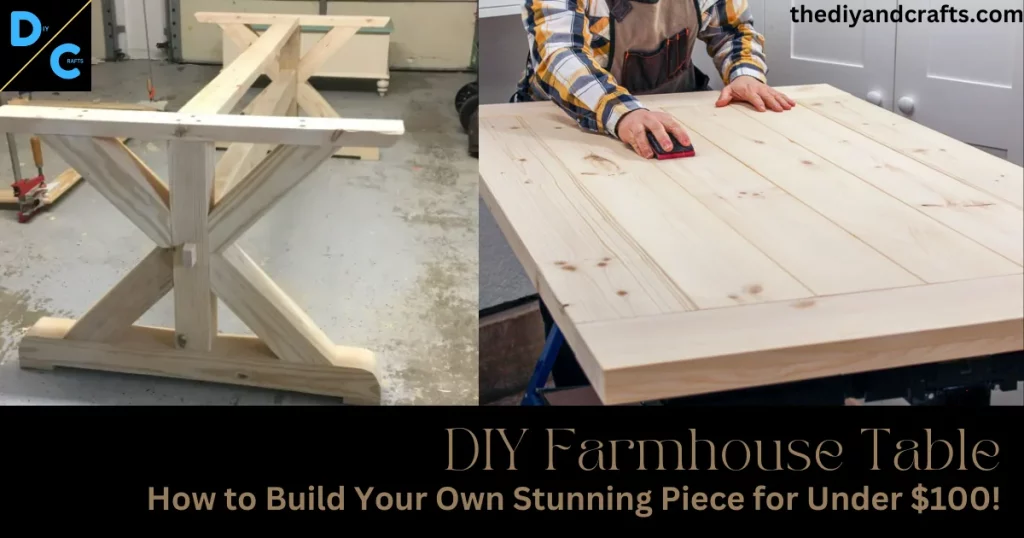
- Definition of DIY Farmhouse Table: A farmhouse table is a sturdy, rustic-style table that is typically made from wood and has a simple, functional design. It often features a large tabletop and thick legs or a pedestal base, and can be used for a variety of purposes, from dining to crafting to working.
- Explanation of its popularity: Farmhouse tables have become increasingly popular in recent years due to their versatility, durability, and aesthetic appeal. They add a cozy, welcoming vibe to any room and can be customized to fit a variety of styles and tastes, from modern to traditional.
- Benefits of building a DIY farmhouse table: Building a DIY farmhouse table can be a rewarding experience for several reasons. First, it allows you to customize the table to fit your specific needs and preferences, from the size and shape to the finish and detailing. Additionally, building your own table can be a cost-effective alternative to buying a pre-made table, and can give you a sense of pride and accomplishment in creating a functional piece of furniture for your home. Finally, building a farmhouse table can be a fun and creative project that can be enjoyed with family and friends, and can be a great way to learn new woodworking skills.
Materials and Tools
- List of necessary materials and tools: Building a DIY farmhouse table requires specific materials and tools. Necessary materials include wood (for the tabletop, legs, and aprons), screws, wood glue, and finishing materials (such as stain or paint). Essential tools include a saw, drill, measuring tape, sander, and clamps. Depending on the design of the table, additional tools and materials may be required.
- Tips on where to find quality materials and tools: Finding quality materials and tools is essential for building a durable and attractive farmhouse table. One option is to visit a local lumber yard or hardware store to purchase wood and tools in person. Another option is to search for materials and tools online, either through home improvement stores or online marketplaces. When selecting materials and tools, it is important to consider factors such as price, quality, and availability. Researching reviews and comparing prices can help ensure that you find the best materials and tools for your project.
Planning and Preparation

- Steps to planning the project: Before starting the project, it is important to plan and prepare carefully. This includes determining the size and design of the table, selecting the appropriate wood and tools, and creating a detailed plan for the construction process. It can be helpful to sketch out a rough design of the table and create a materials list to ensure that all necessary supplies are obtained before beginning.
- Measure and cut the tabletop boards to the desired length.Sand the edges and surfaces of each board until they are smooth.Arrange the boards side by side on a flat surface, ensuring that they are flush at the ends.Use clamps to hold the boards together while attaching them from underneath with pocket hole screws.Repeat the above steps to create the second half of the tabletop.Use wood glue and clamps to join the two halves of the tabletop together, and then attach support boards underneath to reinforce the joint.Measure and cut the legs to the desired length.Sand the edges and surfaces of each leg until they are smooth.Use a table saw or circular saw to create notches on the top of each leg for attaching the tabletop.Attach the legs to the tabletop using wood glue and screws, and then reinforce the joint with corner braces.Measure and cut the aprons to the desired length.Sand the edges and surfaces of each apron until they are smooth.Attach the aprons to the legs using wood glue and screws, ensuring that they are level and at the desired height.Sand the entire table to ensure that it is smooth and free of any rough spots.Apply a protective finish, such as stain or polyurethane, to the table to protect it from wear and tear.
- Following these steps carefully can help ensure that your DIY farmhouse table is built accurately and efficiently, resulting in a sturdy and attractive finished product.
- Preparing the workspace: Creating a suitable workspace is essential for building a DIY farmhouse table. This includes selecting a flat and level surface, ensuring adequate lighting and ventilation, and organizing tools and supplies for easy access. It is also important to take safety precautions, such as wearing protective gear and following safe practices when operating power tools.
- Tips for staying organized throughout the project: Building a DIY farmhouse table can be a complex project, and it can be easy to lose track of materials and steps along the way. Staying organized throughout the project can help ensure that the table is constructed accurately and efficiently. This includes labeling materials and tools, creating a step-by-step plan, and keeping track of measurements and cuts. It can also be helpful to break the project into smaller sections, such as constructing the tabletop or legs, to make the project more manageable.
Building the Table
- Step-by-step instructions for building the table
- Step 1: Cut the lumber – Measure and cut the lumber to the desired dimensions for the tabletop, legs, and aprons using a saw and a straight edge. Sand the edges of the lumber to smooth out any rough spots.
- Step 2: Assemble the tabletop – Arrange the tabletop planks side by side and use clamps to hold them together. Apply wood glue between the planks, and then use a drill and screws to secure them together. Use a sander to smooth out any rough spots on the tabletop surface.
- Step 3: Build the legs – Cut the legs to the desired length and shape using a saw. Sand the edges to smooth them out. Use a drill and screws to attach leg braces to each leg, creating two leg assemblies.
- Step 4: Attach the legs to the tabletop – Place the leg assemblies upside down on the tabletop, ensuring that they are evenly spaced. Use clamps to hold the legs in place and then use a drill and screws to attach the legs to the tabletop.
- Step 5: Add the aprons – Cut the aprons to the desired length using a saw. Sand the edges to smooth them out. Attach the aprons to the underside of the tabletop using a drill and screws. Make sure the aprons are level and evenly spaced.
- Step 6: Finishing touches – Sand the entire table surface to ensure that it is smooth and free from any rough spots. Apply a wood stain or paint to the table as desired, following the manufacturer’s instructions.
- Tips for measuring and cutting wood
Accurate measurements and cuts are essential for building a sturdy and attractive farmhouse table. This includes measuring and marking the wood carefully before cutting, using a straight edge for accurate cuts, and double-checking measurements before making a cut. It can also be helpful to make test cuts on scrap wood to ensure that the saw is set up correctly.
- Techniques for assembling the table
Assembling the tabletop and legs requires specific techniques to ensure that the table is sturdy and level. This includes using clamps to hold the pieces together while assembling, using wood glue to reinforce joints, and attaching the aprons at a consistent height. It is important to follow the step-by-step instructions carefully and to take the time to ensure that each piece is assembled accurately before moving on to the next step.
Finishing the Table
Once the farmhouse table is built, the next step is to finish it. Finishing the table involves several steps to give it a polished and professional appearance.
- Options for finishing the table: There are various options for finishing a farmhouse table, including staining, painting, or leaving it natural. Each option has its own advantages and disadvantages, and it’s essential to choose the one that best suits the table’s style and intended use.
- Tips for staining and painting: If you choose to stain or paint the table, it’s crucial to follow the instructions carefully and apply the product evenly. This includes using a brush or roller to apply the stain or paint in long, even strokes and allowing it to dry completely before applying a second coat.
- Techniques for sealing and protecting the wood: After the stain or paint has dried, it’s important to seal and protect the wood to prevent damage from spills, scratches, and other forms of wear and tear. This can be accomplished by applying a clear coat or wax to the table’s surface, following the manufacturer’s instructions carefully.
By following these tips and techniques, you can ensure that your DIY farmhouse table not only looks great but is also durable and long-lasting.
Decorating the Table
After completing the building and finishing process, it’s time to decorate and style your DIY farmhouse table. Here are some ideas to get you started:
- Ideas for decorating the finished table: From adding a centerpiece to placing decorative items on the table, there are many ways to decorate a farmhouse table. Some popular options include using a table runner, adding a vase of flowers, and placing decorative plates or bowls on the table.
- Tips for styling the table in different spaces: The style and decor of your table can vary depending on the space it’s in. For example, if your table is in a formal dining room, you may want to use a more traditional style of decor. In a casual kitchen or outdoor space, you could incorporate more rustic or eclectic elements.
- Suggestions for adding personal touches:
By incorporating these decorating tips and personal touches, you can make your DIY farmhouse table a beautiful and functional piece in your home.
Conclusion
As we conclude this article, we hope that you have gained valuable insights into building a DIY farmhouse table. In summary, we have covered the definition of a farmhouse table, its popularity, and the benefits of building one yourself. We have also provided a list of necessary materials and tools, tips for planning and preparation, step-by-step instructions for building the table, techniques for finishing the table, and ideas for decorating the finished product.
We encourage you to try building a DIY farmhouse table, as it can be a rewarding and enjoyable project. With the right tools and instructions, anyone can create a beautiful and functional table for their home. Finally, we hope that you have found this article helpful, and we invite you to explore additional resources on our website for more DIY and craft projects.
You can also read –
- Man Made DIY Crafts for Men – Insanely Awesome DIY Crafts For Men in 2023
- Stamped Cross Stitch Kits: The Secret to Creating Professional-Looking Projects in 2023!
- DIY Furniture Sliders – Say Goodbye to Scratched Floors Forever
- DIY Furniture Restoration (10 key points) – How to Refurbish Old Furniture
- DIY Natural Cleaning Products: Homemade Recipes for a Chemical-Free Home
- DIY Upcycling Projects (Top 10) to Repurpose Old Household Items