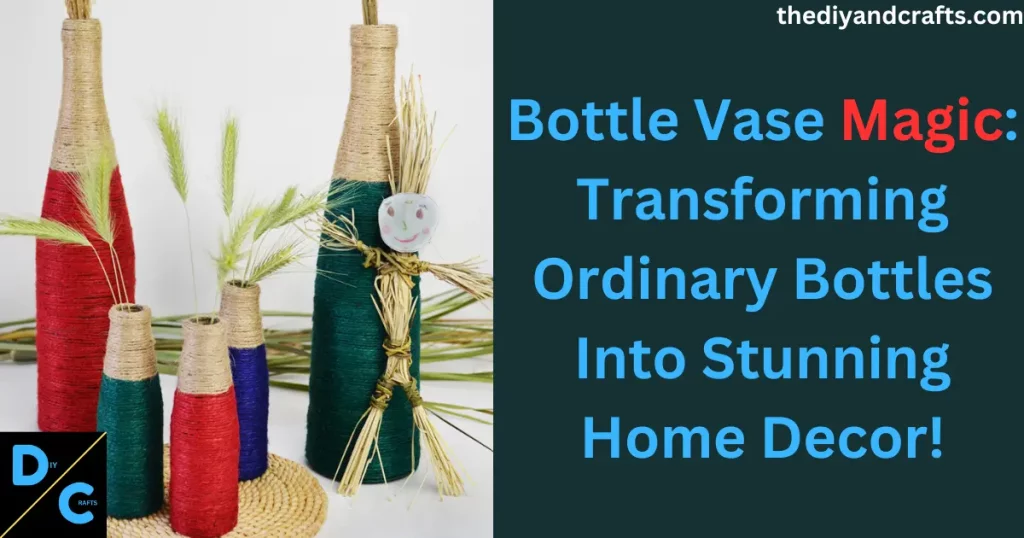
Welcome to our DIY and crafts blog, where creativity knows no bounds! If you’re a fan of unique and budget-friendly home decor, then you’re in for a treat with our latest article all about “Bottle Vase” magic. In this post, we’ll be diving into the world of upcycling and exploring how ordinary bottles can be transformed into stunning vases with just a few simple DIY techniques. Whether you’re a seasoned crafter or new to the world of DIY, this article has something for everyone. From painting to decoupage, etching to ribbon-wrapping, we’ll be covering a variety of creative ideas and techniques to help you unleash your creativity and create beautiful bottle vases that will add charm and style to any room. So, let’s roll up our sleeves, grab some bottles, and let the crafting magic begin!
Introduction:
If you’re looking for a versatile and eco-friendly way to add a touch of charm and uniqueness to your home decor, then bottle vases are just the thing for you. A bottle vase is essentially a transformed bottle that has been creatively repurposed into a decorative vase.
With endless possibilities for customization, bottle vases can be used in a variety of ways to elevate the aesthetics of your living space or as thoughtful gifts for loved ones. In this article, we’ll be exploring the art of creating bottle vases, from painting to decoupage, etching to ribbon-wrapping, and more.
We’ll share step-by-step tutorials, creative ideas, tips, and tricks to help you unleash your creativity and craft your beautiful bottle vases.
So, whether you’re a seasoned DIY enthusiast or just starting, this article is your ultimate guide to creating stunning bottle vases that are not only budget-friendly but also eco-friendly. Join us as we embark on this exciting DIY journey and discover how to bottle vases can be a fun and fulfilling craft project that adds a touch of elegance to your home!
Materials and Tools:
To create your beautiful bottle vase, you’ll need a few materials and tools. Here’s a list of what you’ll need:
- Bottles: You can use various types of bottles for your vases, such as glass, plastic, or even wine bottles. Choose bottles with interesting shapes, sizes, and colors that suit your aesthetic preference.
- Paint: Acrylic paints work well for glass and plastic bottles, while enamel paints are ideal for wine bottles. Choose a variety of colors that complement your home decor or personal style.
- Brushes: You’ll need a selection of paint brushes in different sizes and shapes for applying paint, stenciling, or creating designs on your bottle vase.
- Stencils: Stencils are a great tool for adding patterns, motifs, or designs to your bottle vase. You can purchase pre-made stencils or create your own using plastic sheets or cardboard.
- Glue: Depending on the type of decoration you plan to use, you may need glue or adhesive to attach items such as ribbons, beads, or other embellishments to your bottle vase.
- Ribbon: Ribbon can add a touch of elegance to your bottle vase. Choose ribbons in various colors, widths, and textures to suit your design.
- Other Decorative Items: Get creative with other decorative items such as beads, buttons, charms, or fabric scraps to add unique accents to your bottle vase.
- Protective Gear: When working with paints, adhesives, or other chemicals, it’s important to protect yourself. Make sure to have gloves, aprons, and other appropriate protective gear on hand.
With these materials and tools, you’ll be well-equipped to create your stunning bottle vase and customize it to your liking. Get ready to unleash your creativity and transform ordinary bottles into unique and eye-catching decorative pieces!
Step-by-Step Tutorial:
Step 1:
Prepare the Bottle Start by selecting a bottle of your choice and cleaning it thoroughly, removing any labels or residue. You can use warm soapy water or a mixture of water and vinegar to clean the bottle. Rinse it thoroughly and allow it to dry completely.
Step 2:
Choose Your Decorating Technique Next, decide on the decorating technique you want to use for your bottle vase. You can choose from various options such as painting, decoupage, etching, or wrapping with ribbon or twine. Each technique offers a unique look and requires different materials and tools.
Step 3:
Painting If you choose to paint your bottle vase, start by applying a primer coat to ensure the paint adheres well to the bottle surface. Once the primer is dry, apply your desired color of acrylic or enamel paint using a paintbrush or sponge. You can create different patterns, designs, or even gradients with different colors. Allow the paint to dry completely between coats, if necessary, and apply additional coats until you achieve the desired opacity.
Step 4:
Decoupage To create a decoupage bottle vase, you’ll need some decorative paper, such as tissue paper, napkins, or patterned paper, and decoupage glue. Cut the paper into small pieces or shapes and apply a thin layer of decoupage glue to the bottle surface. Place the paper pieces onto the glue, overlapping them slightly, and smooth out any wrinkles or bubbles with a brush or your fingers. Apply another layer of decoupage glue over the paper, making sure to seal the edges. Allow it to dry completely.
Step 5:
Etching Etching is a technique that gives a frosted or textured appearance to the glass surface of a bottle vase. You’ll need etching cream, a stencil or sticker for your design, and a brush or sponge. Apply the stencil or sticker to the clean bottle surface and use a brush or sponge to apply a thick layer of etching cream over the stencil or sticker. Follow the manufacturer’s instructions for the specific etching cream you’re using, as the process may vary. After the recommended time, rinse off the etching cream thoroughly and remove the stencil or sticker to reveal your etched design.
Step 6:
Ribbon or Twine Wrapping For a rustic or shabby-chic look, you can wrap your bottle vase with ribbon or twine. Start by applying a small dab of glue at the bottom of the bottle and securing the end of the ribbon or twine. Wrap it around the bottle in a spiral or crisscross pattern, securing it with glue as needed along the way. You can add beads, charms, or other decorative items to the ribbon or twine for added flair.
Step 7:
Finishing Touches Once your bottle vase is decorated to your satisfaction, you can add any finishing touches you desire. This may include adding a coat of sealant or varnish to protect the paint or decoupage, tying a bow with ribbon, or attaching additional embellishments.
Step 8:
Enjoy Your Bottle Vase! After allowing any glue, paint, or sealant to dry completely, your bottle vase is ready to use! Place your favorite flowers, greenery, or other decorative items inside the vase and display it proudly in your home or gift it to someone special.
Tips:
- Experiment with different colors, patterns, and techniques to create unique and personalized bottle vases.
- Use stencils, stickers, or templates to create precise designs or patterns on your bottle vase.
- Protect your work surface with newspaper or a drop cloth to catch any spills or drips.
- Follow the instructions and safety precautions on the labels of the products you’re using, especially when working with etching cream
Creative Ideas:
Bottle vases offer endless possibilities for creativity and customization. With just a few simple techniques and materials, you can transform ordinary bottles into stunning vases that add charm and character to any room or occasion. Here are some creative ideas to inspire you:
- Wine Bottle Vase: Wine bottles are perfect for creating elegant and sophisticated vases. You can paint them with metallic or pastel colors for a modern look, or wrap them with twine or lace for a rustic touch. Add a cork or decorative stopper to complete the look.
- Mason Jar Vase: Mason jars are versatile and can be used in various ways to create unique vases. You can paint them with chalk paint for a shabby-chic or farmhouse style, or decoupage them with vintage-inspired paper for a nostalgic vibe. Fill them with wildflowers or herbs for a charming centerpiece.
- Milk Bottle Vase: Milk bottles have a classic and vintage appeal that can add a touch of nostalgia to your home decor. You can etch them with a monogram or a vintage design for an antique look, or paint them with pastel colors for a sweet and whimsical vibe. Add a ribbon or lace bow for a finishing touch.
- Upcycled Bottle Vase: Get creative with upcycling and repurpose old bottles into unique vases. For example, you can use a perfume bottle, a soda bottle, or a glass bottle from a sauce or condiment as a small bud vase. Paint them with vibrant colors, add beads or charms, or wrap them with wire for a funky and eclectic look.
- Seasonal Bottle Vase: Use bottle vases to create seasonal decor for different occasions or holidays. For example, you can paint a bottle orange and black for Halloween, red and green for Christmas, or pastel colors for Easter. Add seasonal-themed decals, ribbons, or embellishments to create festive vases that capture the spirit of the season.
- Personalized Bottle Vase: Create a special and meaningful bottle vase by adding a personalized touch. You can paint the bottle with the recipient’s favorite colors, initials, or a special date. Add a photo transfer, a hand-painted design, or a sentimental quote to make it truly unique and thoughtful.
- Nature-Inspired Bottle Vase: Bring the beauty of nature indoors by creating bottle vases inspired by the natural world. You can wrap a bottle with jute or twine and add seashells, driftwood, or dried flowers for a beachy or coastal vibe. Use bark, moss, or feathers to create a woodland or rustic-themed vase. Let your creativity run wild with the endless possibilities of nature-inspired bottle vases.
With these creative ideas, you can transform ordinary bottles into extraordinary vases that add a touch of DIY charm to your home decor or make thoughtful and personalized gifts for your loved ones. Let your imagination soar and create stunning bottle vases that reflect your style and creativity. Happy crafting!
Mastering the Art of Bottle Vases: Tips, Tricks, and Hacks for DIY Success
Creating beautiful bottle vases can be a fun and rewarding DIY project, but it’s important to have some tricks up your sleeve to ensure success. Here are some valuable tips and tricks to help you achieve professional-looking results:
- Choose the Right Type of Paint: When painting your bottle vase, it’s crucial to select the right type of paint that adheres well to the material of the bottle. For glass bottles, use enamel or glass paint that is designed to bond with glass surfaces. For plastic bottles, use acrylic or spray paint formulated for plastic. Make sure to follow the manufacturer’s instructions for proper application and drying times.
- Prep the Surface: Properly preparing the surface of the bottle is key to achieving a smooth and durable finish. Clean the bottle thoroughly, removing any labels, dirt, or residue. Sand the surface lightly with fine-grit sandpaper to create a rough texture that helps the paint adhere better. Wipe the bottle with a clean cloth to remove any dust or debris before applying paint or adhesive.
- Use Stencils for Clean Designs: If you want to create intricate designs on your bottle vase, consider using stencils. Stencils can help you achieve clean and precise designs without the need for freehand painting. You can purchase pre-made stencils or create your own using stencil blanks and a cutting tool. Secure the stencil firmly on the bottle with tape or adhesive, and apply paint carefully within the stencil openings for a professional-looking result.
- Experiment with Different Techniques: Don’t be afraid to get creative with different techniques to decorate your bottle vase. Try decoupaging with paper or fabric, etching with etching cream or sandpaper, or wrapping with twine, ribbon, or lace. Mix and match techniques to create unique and interesting textures and patterns on your bottle vase.
- Add Sealant for Durability: To protect your bottle vase and ensure its longevity, consider adding a sealant or varnish after the paint or adhesive has dried completely. A clear sealant can help protect the paint from chipping or peeling and make the surface easier to clean. Follow the manufacturer’s instructions for proper application and drying times of the sealant.
- Troubleshoot Common Issues: If you encounter common issues during the DIY process, don’t panic. For example, if the paint is not adhering well, try lightly sanding the surface again or using a primer before applying the paint. If the paint is streaky, try applying thin and even coats, allowing each coat to dry completely before applying the next. If the adhesive is not sticking, make sure the surface is clean and dry, and apply a strong adhesive specifically formulated for the material of the bottle.
- Practice Patience and Practice, Practice, Practice: Like any DIY project, creating bottle vases requires practice and patience. Don’t get discouraged if your first attempt doesn’t turn out perfectly. Keep practicing and experimenting with different techniques until you achieve the desired result. Remember, practice makes perfect!
With these tips, tricks, and hacks, you can overcome common challenges and achieve professional-looking results when creating your bottle vases. Embrace your creativity, have fun, and enjoy the process of mastering the art of bottle vases!
Safety First: Essential Precautions When Creating Bottle Vases
While creating bottle vases can be an enjoyable DIY project, it’s important to prioritize safety. Here are some essential safety precautions to keep in mind when working with bottles:
- Wear Protective Gloves: When handling bottles, especially when using sharp tools or working with adhesives, it’s important to wear protective gloves to prevent cuts or injuries to your hands. Choose gloves that fit well and provide adequate protection for your specific DIY project.
- Use Sharp Tools Carefully: Sharp tools such as knives, scissors, or glass cutters may be needed when preparing bottles for decorating. Always handle sharp tools with care, and use them in a safe and controlled manner. Keep your fingers away from the cutting edges and use appropriate cutting techniques to avoid accidents.
- Work in a Well-Ventilated Area: If you are using paints, adhesives, or other materials that emit fumes, make sure to work in a well-ventilated area or outdoors. Proper ventilation helps to minimize exposure to potentially harmful fumes and ensures a safe working environment. If necessary, use a respirator or mask to protect your respiratory system.
- Follow Manufacturer’s Instructions: When using paints, adhesives, or other products, always read and follow the manufacturer’s instructions carefully. This includes information on proper application, drying times, and safety precautions. Use products only as intended and follow the manufacturer’s recommendations.
- Dispose of Waste Properly: Dispose of waste materials, such as empty paint cans, brushes, or other tools, following local regulations. Avoid pouring paints, solvents, or other chemicals down the drain or into the environment. Properly dispose of waste materials to protect the environment and ensure safe disposal.
- Keep Children and Pets Away: If you are working with potentially hazardous materials or tools, make sure to keep children and pets away from your work area. Store sharp tools, paints, and adhesives safely and out of reach of children and pets.
- Take Breaks and Stay Hydrated: DIY projects can be time-consuming, so make sure to take regular breaks and stay hydrated. Dehydration and fatigue can increase the risk of accidents, so make sure to drink plenty of water and rest when needed.
By following these safety precautions, you can ensure a safe and enjoyable DIY experience when creating bottle vases. Always prioritize safety and take necessary precautions to protect yourself and others while working on your project
Conclusion: Create Your Stunning Bottle Vases!
In conclusion, bottle vases are a versatile and eco-friendly DIY craft that can add a touch of creativity and charm to your home or make thoughtful gifts for loved ones. From painting and decoupage to etching and ribbon-wrapping, there are endless possibilities for creating unique and personalized bottle vases.
In this article, we covered the materials and tools you’ll need, provided a step-by-step tutorial, shared creative ideas for different types of bottle vases, and offered tips and tricks to ensure a successful DIY project. We also emphasized the importance of following safety precautions when working with bottles to ensure a safe and enjoyable crafting experience.
Now it’s time to unleash your creativity and give bottle vases a try! Share your creations on social media, leave comments with your thoughts or questions, and explore other DIY and craft articles on our website for more inspiration. Get ready to transform ordinary bottles into stunning vases that will enhance your home decor or make heartfelt gifts for your loved ones. Happy crafting!
You can also read –
- Top 10 Easy DIY Home Decor Ideas
- Large Macrame Wall Hanging: Discover the Art of Amazing Macrame
- Organic Gardening Made Easy: Tips & Tricks for a Thriving Garden
- DIY Raised Garden Beds: Grow Your Own Fresh Produce
- DIY Home Decor Ideas for the Holidays
- DIY Upcycling Projects (Top 10) to Repurpose Old Household Items
Pingback: Top 10 Easy DIY Home Decor Ideas - The DIY and Crafts
Woow! This is great!